
19 Jun 2026
Post by Gabriel
Introduction
Chromebooks offer affordability and simplicity, making them a top choice for many users. Occasionally, however, small hardware issues like a loose key can hinder your device’s performance. Mastering the skill to reattach a key can save you from the hassle of professional repairs. This comprehensive guide aims to empower you with easy-to-follow steps to get your Chromebook keyboard back in top condition.

Understanding Your Chromebook Keyboard
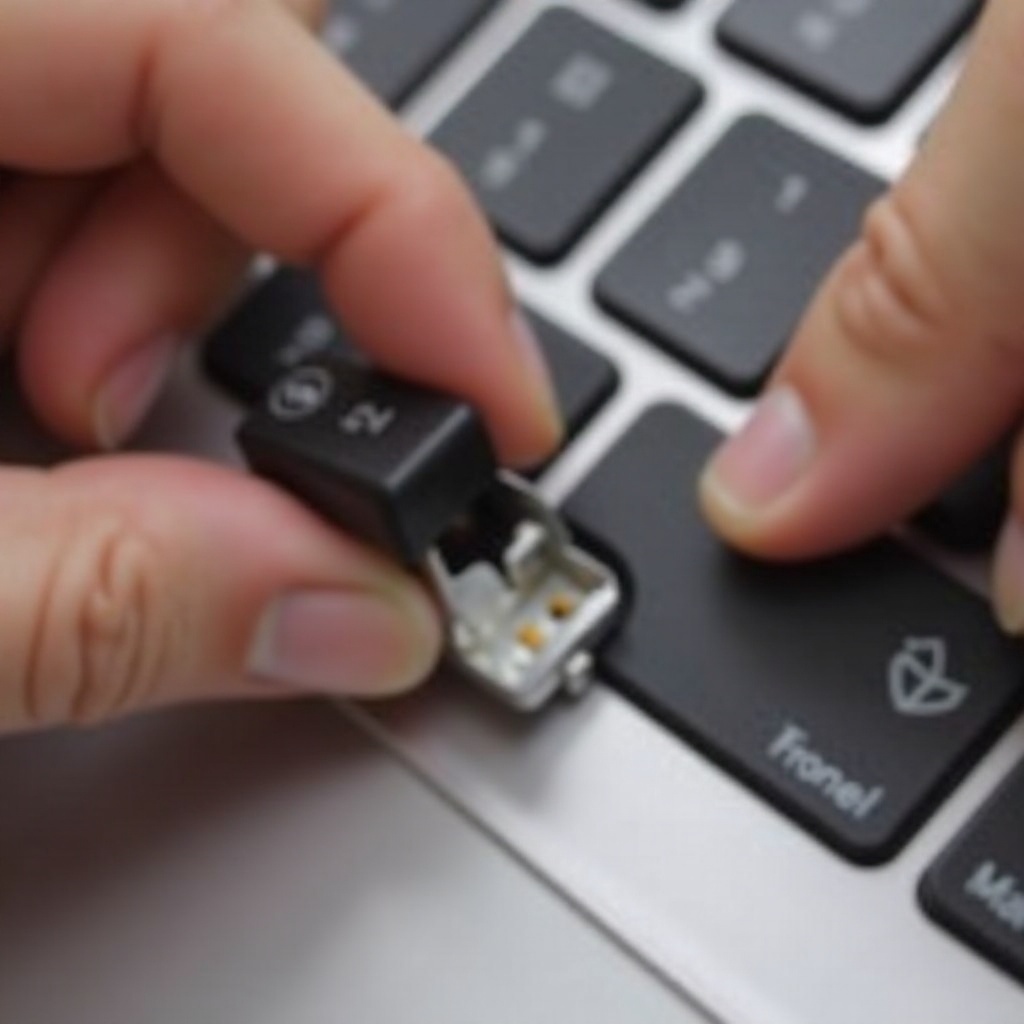
Before diving into the reattachment process, it’s crucial to familiarize yourself with the key components of your Chromebook keyboard. Each key comprises a:
- Keycap: The visible part of the key that you press.
- Retainer Clip: This holds the keycap stable.
- Hinges: These allow the key to move smoothly when pressed.
While slight differences may exist between Chromebook models, this basic structure remains consistent. Understanding these elements will help you efficiently and carefully handle each component during the repair. Knowing the parts will also enhance your confidence in proceeding with the task, knowing that you can correctly identify and handle each piece with ease.
Tools and Materials Required
Gathering your tools beforehand will streamline the repair process. You’ll need:
- A small screwdriver
- Tweezers for precision
- Compressed air or a soft brush for cleaning
- A replacement key or retainer clip if necessary
Having these items ready ensures a smooth workflow without interruptions, so you’re not scrambling for tools mid-repair. This preparation will save you time and keep the process hassle-free as you tackle the broken key issue on your Chromebook.
Preparing for the Repair
Proper preparation prevents potential complications during the reattachment process. Here’s how to start:
- Power Off the Chromebook: Prevents unintended key presses.
- Lay the Chromebook on a Flat, Stable Surface: Minimizes any handling mistakes.
- Survey the Keyboard: Check for any damaged or missing components.
- Gather All Parts: Ensure you have all necessary parts within reach.
Setting up correctly creates a stable foundation for the repair, helping to mitigate the risk of further damaging your Chromebook during the fix. A solid preparation stage also supports smoother transitions to subsequent steps without avoidable delays or simple accidents.
Step-by-Step Guide to Reattaching a Chromebook Key
To reattach a key on a Chromebook, follow these systematic instructions:
-
Inspect the Key and Keyboard: Identify any missing or damaged parts around the area where the key detaches. Make sure the retainer clips and keycap are intact.
-
Clean the Area: Use compressed air or a brush to clear out dust or debris. This ensures nothing is blocking the key from being securely reattached.
-
Align the Keycap with Retainer Clips:
- Position the retainer clip over the hinge correctly.
-
Ensure both the retainer clip and the hinge snap into place together, preparing for the keycap.
-
Secure the Keycap in Place:
- Place the keycap gently over the retainer clip.
-
Press down until you hear it click into position, confirming it’s secured.
-
Test the Key Functionality:
- Press the key multiple times to ensure it moves smoothly and registers correctly without sticking.
Navigating these steps with precision ensures a successful fix, with your device back to optimal condition. By understanding and following each step with patience, you can confidently perform a simple repair that extends your Chromebook’s usability.
Troubleshooting Common Issues
Though rare, issues may occasionally arise during or after your repair. Some common situations include:
- Misaligned Keys: If a key appears off-center, remove and reattach it with careful alignment to the retainer clip.
- Sticky Movement: Verify that all components are secure and that no debris is obstructing the key’s movement. Sometimes, an additional cleaning might resolve stickiness.
- Unresponsive Keys: Double-check connections and consider a replacement part if problems persist. Professional assistance may be required if the issue isn’t resolved.
These tips guide you in addressing potential issues effectively, minimizing any lingering concerns about your Chromebook’s functionality.
Maintenance Tips for Your Chromebook Keyboard
Regular maintenance can prevent recurrence of key issues and sustain your keyboard’s efficiency:
- Regular Cleaning: Use compressed air weekly to dislodge dust from between keys.
- Protection: Consider using a thin keyboard cover to guard against spills and dust.
- Gentle Handling: Encourage soft typing habits to prolong the life of your keyboard.
Integrating these habits into your regular Chromebook care routine will reduce the likelihood of needing repairs, thereby extending your device’s lifespan.

Conclusion
Restoring a detached key on your Chromebook is a manageable task with the right approach. By following these clear steps, you can avoid unnecessary professional service calls. Understanding your device empowers you to handle minor tech issues independently, providing a sense of accomplishment and ensuring your Chromebook remains in excellent working order.
Frequently Asked Questions
What should I do if my key is still not working after reattaching it?
Double-check the alignment and ensure all components are properly clipped. If issues persist, professional repair services may be needed.
Can I use the same steps for different Chromebook models?
These steps are generally applicable across Chromebook models. However, consult your device’s manual for any model-specific instructions.
Where can I find replacement keys for my Chromebook?
Replacement keys can be sourced online from dedicated laptop part retailers or general electronics stores. Ensure you select the correct model when purchasing.